Sunday, December 9, 2018

Disable Windows Defender in Windows 10


Disable Windows Defender in Windows 10 Fall Creators


Windows Defender is the default antivirus app shipped with Windows 10. Earlier versions of Windows like Windows 8.1, Windows 8, Windows 7 and Vista also had it but it was less efficient previously as it only scanned spyware and adware. In Windows 8 and Windows 10, Defender is based on the Microsoft Security Essentials app which offers better protection by adding full blown protection against all kinds of malware. However, if you prefer to use alternative solution for protecting your PC, you might want to disable Windows Defender. Here is how you can disable it in Windows 10 Fall Creators Update.
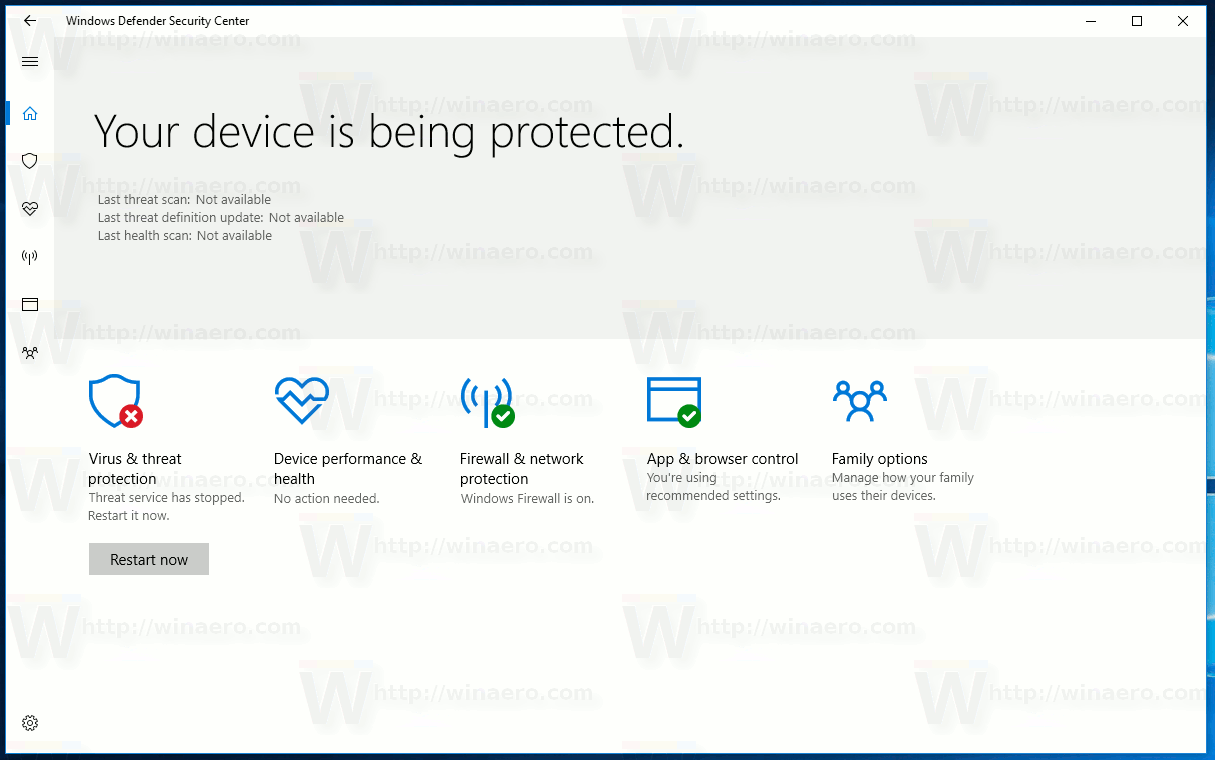
Windows 10 Security Center
Note: This will not remove the Windows Defender icon in the system tray:
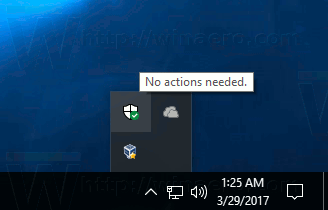
Windows Defender Security Center Icon
To hide the icon, refer to the following article:
Recent Windows 10 version come with is a new app called Windows Defender Security Center. The application, formerly known as "Windows Defender Dashboard", has been created to help the user control his security and privacy settings in a clear and useful way. It includes all the settings related to Windows Defender. See the following article: Windows Defender Security Center in Windows 10 Creators Update.
It is possible to use Windows Defender Security Center to temporarily disable Windows Defender in Windows 10 Fall Creators Update. After some period of time, it will be re-enabled automatically. For some users, this solution is suitable. Here is how it can be done.
To disable Windows Defender in Windows 10 Fall Creators Update, do the following.
  1. Open Windows Defender Security Center. You can launch Windows Defender Security Center from the Start menu or with a special shortcut.
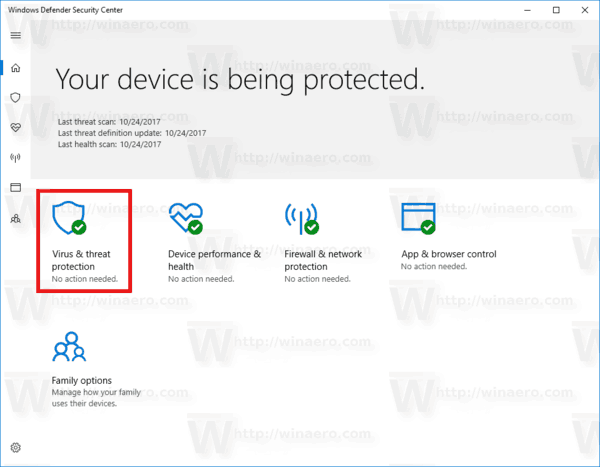
  2. In the user interface of the app, click on the icon Virus & Threat protection.Windows 10 Defender Virus And Threat Protection
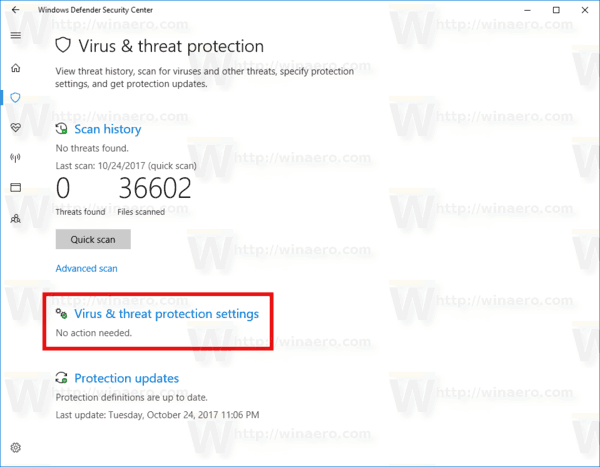
  3. On the next page, click on the link Virus and threat protection settings.Windows 10 Defender Virus And Threat Protection Page
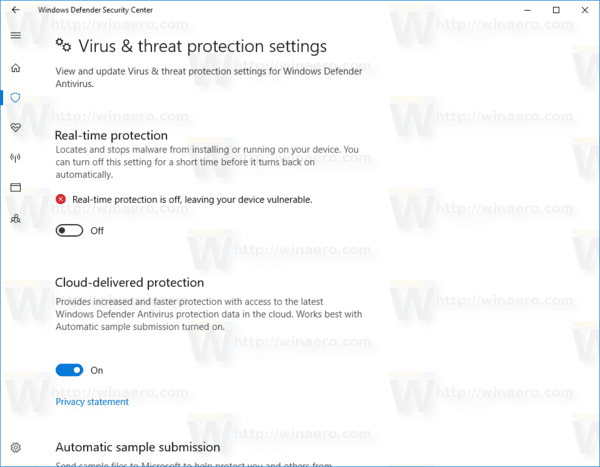
  4. On the next page, toggle the Real-time protection option to Off. This will temporarily disable Windows Defender in Windows 10.Disable Real Time Protection Windows Defender
Unfortunately, it is not possible to use the method described above if you need to disable Windows Defender permanently. You need to apply a Registry tweak instead.

Download Windows 10 Version 1809 ISO Images Directly Without Media Tool


Download Windows 10 Version 1809 ISO Images Directly Without Media Tool


Windows 10 Build 17763 is the final version of Windows 10 October 2018 Update. It is available in the production branch. Today, we will see how to download official ISO images made by Microsoft to install this build from scratch directly without using the Media Creation Tool app.
Here is an unofficial method to get official ISO images without downloading and using the Media Creation Tool.
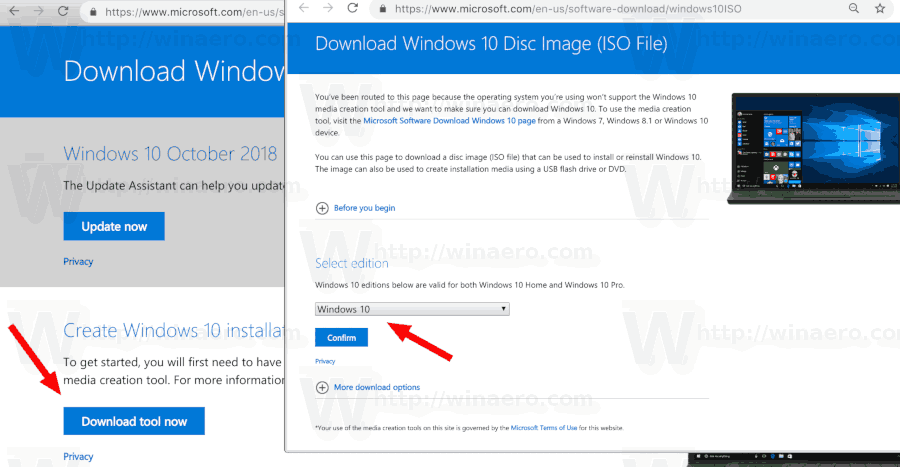
The download page on Microsoft's web site checks the user agent of the browser. If it reports the Windows operating system, the Media Creation Tool will be offered for download. However, if the user agent reports Linux, Android or iOS, you will see direct download links to ISO files. Here is how the download page is displayed in my Chrome running on Linux with the default user agent. Notice the same page opened in the background with a different user agent (I've set it to Edge on Windows 10. I got automatically redirected to ISO images.
Windows 10 User Agent Difference
If you are running Windows, you can install a special extension in Firefox or Chrome (or any other Chromuim-based browser) and replace the user agent to get ISO images directly. 
Let's see today how it can be done using Google Chrome without installing any extension.
To download Windows 10 version 1809 ISO images directly, do the following.
1. Now, you can download the ISO image directly!      

Windows 10 Download ISO Image Directly 2. Open Google Chrome and navigate to the following page: Download ISO images.
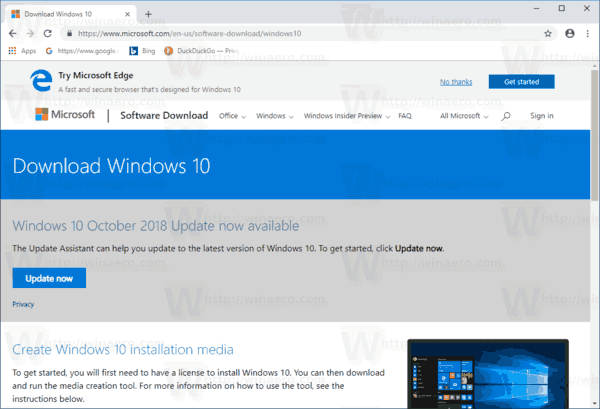
  1. Windows 10 Default Download Page
  2. You will be prompted to download Windows Media Creation Tool. Do not download anything. Instead, press the F12 key to open Developer Tools in Google Chrome.
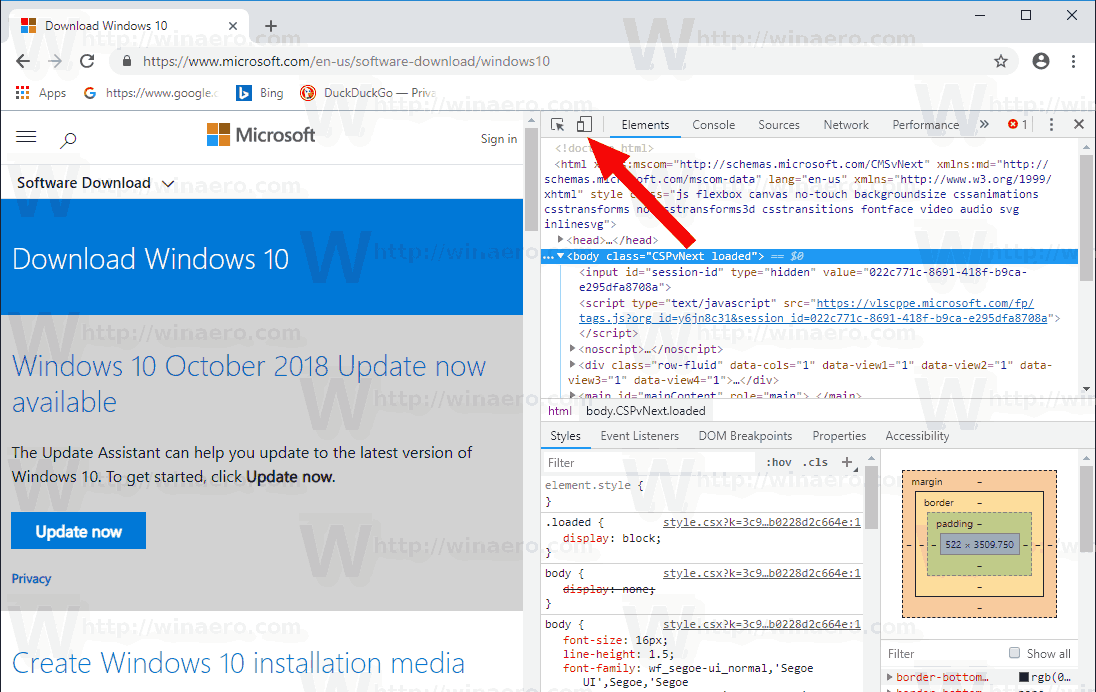
  3. In Developer Tools, click on the Mobile device icon. This will start the Mobile Device Emulator feature.Windows 10 Download Page Chrome Developer Tools
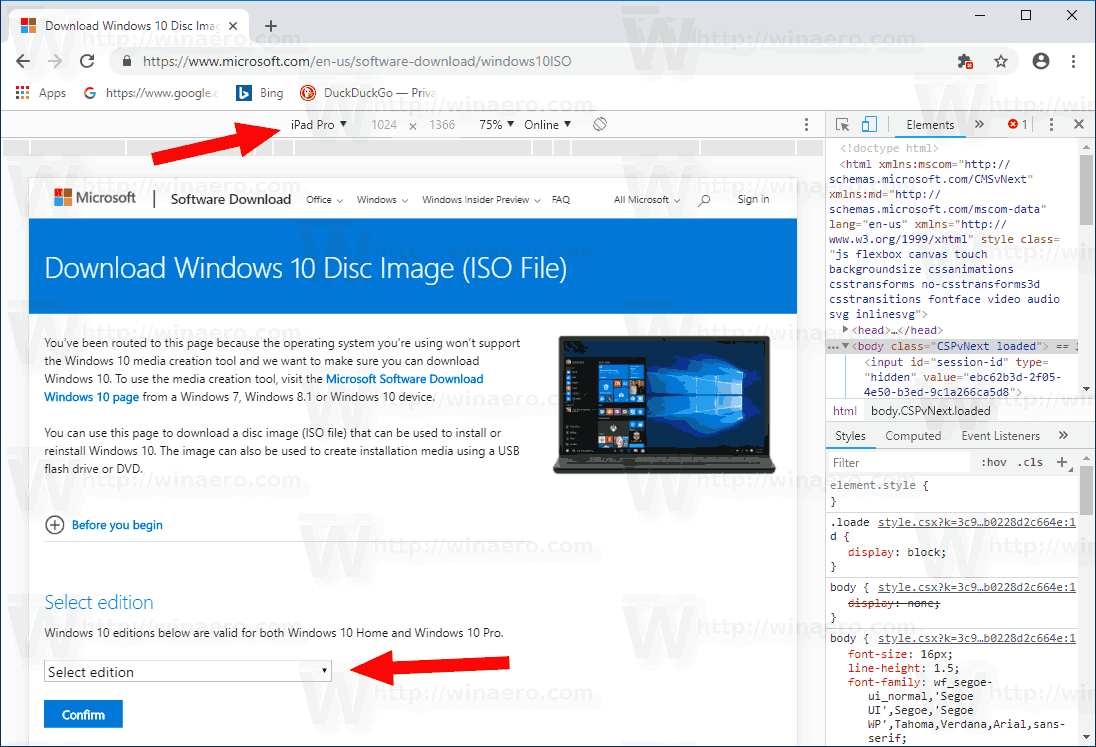
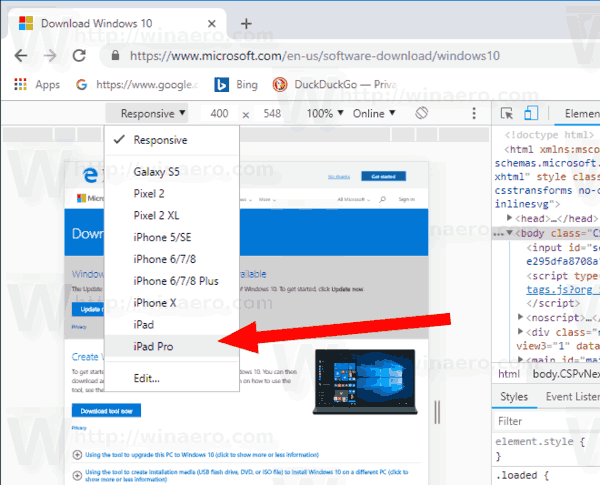
  4. Click on the "Responsive" text to change the emulated device. Select iPad Pro from the list.Windows 10 Chrome Developer Tools Change Device
  5. Click on the page reload icon next to the address bar.Chrome Page Reload ButtonThis will update the download page.
You won't be suggested to install Media Creation Tool.

Download the official ISO image

Do it as follows.
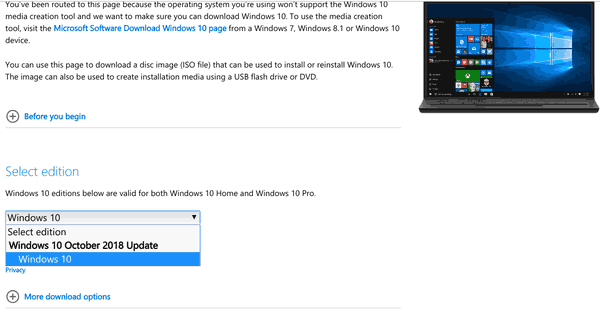
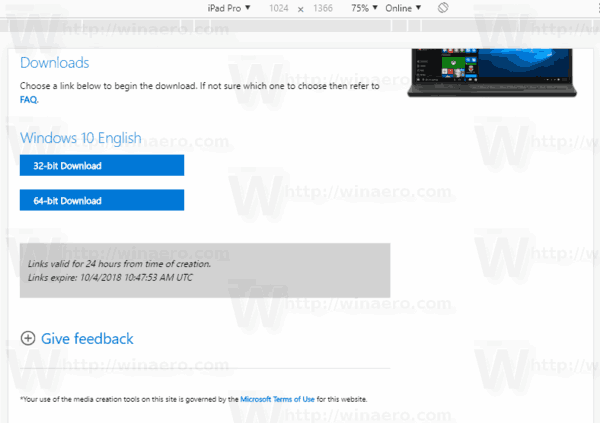
  1. Under Select edition, select Windows 10 October 2018 Update -> Windows 10.Download ISO Version 1809
  2. Click on the Confirm button.
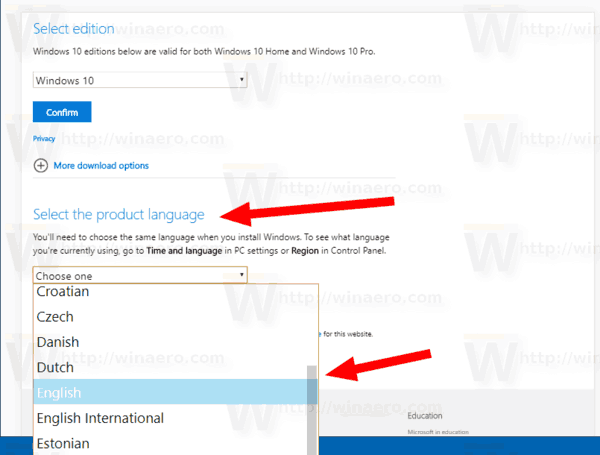
  3. In the next step, choose the required language/MUI for the OS.Download ISO Version 1809 Language Step
  4. Finally, you will be given the links to both 32-bit and 64-bit Windows 10 versions of the October 2018 Update.Download ISO Version 1809 Links

How to Disable Screen Rotation in Windows 10

How to Disable Screen Rotation in Windows 10


Modern tablets and convertibles support screen rotation thanks to built-in hardware sensors. When you turn your device, its desktop may change the display to a portrait or landscape orientation. This is very useful, because you will always see your software from the right angle. There is a way to lock the rotation, so the display will remain in a portrait or landscape orientation regardless of your device's position.


The automatic screen rotation feature is very useful. However, there are a number of situations when it can be annoying. The best example is when you are lying in your bed with your tablet and reading something. Once you change the screen angle a little, the device suddenly changes the screen orientation. This is very disturbing. That's why you may want to temporarily lock the screen rotation.
Windows 10 Rotate Screen

In Windows 10, you can use of the methods listed below.
image for Screen Rotation
To disable Screen Rotation in Windows 10, do the following.

Open the Action Center. You can tap on its icon in the system tray (notification area).
In the Action Center, tap on the quick action button "Rotation lock" to enable it.How To Disable Screen Rotation In Windows 10
Later, you can unlock the screen rotation feature using the same button.
Tip: If you have a keyboard connected to your device, you can use the Win + A shortcut keys to quickly open the Action Center.

Also, there is a dedicated hotkey to toggle enable the Rotation lock. Just press Win + O.

There are a number of alternative methods.

Disable Screen Rotation in Windows 10 Settings
image for disable Screen Rotation
Open the Settings app.
Go to System -> Display.
On the right, turn on the option Rotation lock.Windows 10 Rotation Lock
The screen rotation feature is now disabled.
Finally, if required, you can apply a Registry tweak. Here is how.

Disable Screen Rotation with a Registry tweak
Note: You must be signed in with an administrative account to continue.

Open the Registry Editor app.
Go to the following Registry key.
HKEY_LOCAL_MACHINE\SOFTWARE\Microsoft\Windows\CurrentVersion\AutoRotation
See how to go to a Registry key with one click.

On the right, create a new 32-Bit DWORD value Enable.
Note: Even if you are running 64-bit Windows you must still create a 32-bit DWORD value.
Set its value data to 1 to enable the feature. A value data of 0 will disable it.
To make the changes done by the Registry tweak take effect, you need to sign out and sign in again to your user account.